
Much of the magic of Marketing Cloud relies on invisible data extensions called Data Views. These are data extensions that house the data of sends, opens, clicks, subscribers, journeys, etc. However, they are not immediately visible to the user. There are ways to extract this data using reports or data extracts. You can also leverage this data by using the built-in Einstein features, like Einstein Send Time Optimization and Einstein Engagement splits in Journey Builder.
The Use Case for Replicating Data Views
However, there are other times that you might want to pull from this data without generating reports or writing one-off SQL queries. For example, you might want to use a suppression data extension in a Salesforce Send where you exclude anyone who has already opened an email on the day of the send. Or you might want to quickly skim through the bounces for a particular day if you suspect that perhaps Hotmail has blocked your domain.
I especially recommend creating these Data View data extensions if you have someone working in your Marketing Cloud org who does not feel comfortable writing SQL queries. This way they can easily create filtered data extensions from the data extensions you are going to create.
The Problem with Manual Creation
I despise making Data Extensions in Marketing Cloud. I think it is tedious. It can also be quirky:
- If a Data Extension is in a Data Designer relationship, you cannot make updates in Email Studio
- Sometimes updates in Contact Builder do not stick
- Recently I was trying to add a boolean field to a data extension in Contact Builder and it would only let me select field type “text”
Creating Data Extensions that replicate Data Views is particularly painful. Some of them have a lot of fields. While the Data Views are not visible, Salesforce does document all the Data Views and their fields so you can replicate them yourself.
Since I found myself adding Data View replicas to multiple Marketing Cloud environments, I decided I needed a way to automate this process.
The Solution: GitHub Repository + API
Here is a GitHub repository with the SOAP API for almost every Data View. As of this writing, I still have a few to build. They are not ones I have yet to use, so I have not gotten to them yet (but I will).
And here is the easiest way to create Data Extensions on the fly:
Step 1: Download Postman
First, if you do not have Postman, download it now.
Update (2024): Salesforce now provides an official Marketing Cloud APIs Postman Collection that includes pre-built requests for many Marketing Cloud operations. You can use this alongside the custom Data View creation method outlined below, or as an alternative starting point for your API workflows.
Step 2: Create Marketing Cloud API Package
Second, create an API package in Marketing Cloud.
Package Setup Process:
- In Marketing Cloud, navigate to Setup → Platform Tools → Apps → Installed Packages
- Create a new package (the name you choose will show up as “Created By” on Data Extensions)
- After the Package is created, select Add Component
- Choose Server-to-Server as the API type
- Authorize the component for at least Read and Write under Data Extensions
Once this Component is added, you will have:
- Client ID
- Client Secret
- Authentication Base URI
- REST Base URI
- SOAP Base URI
Step 3: Configure Postman Environment
Environment Setup:
- Open Postman and click the gear icon in the upper right corner
- Select “Add” under Manage Environments and name the environment
- Add the following variables:
AuthenticationBaseURIClientIdClientSecretRESTBaseURISOAPBaseURIaccessToken
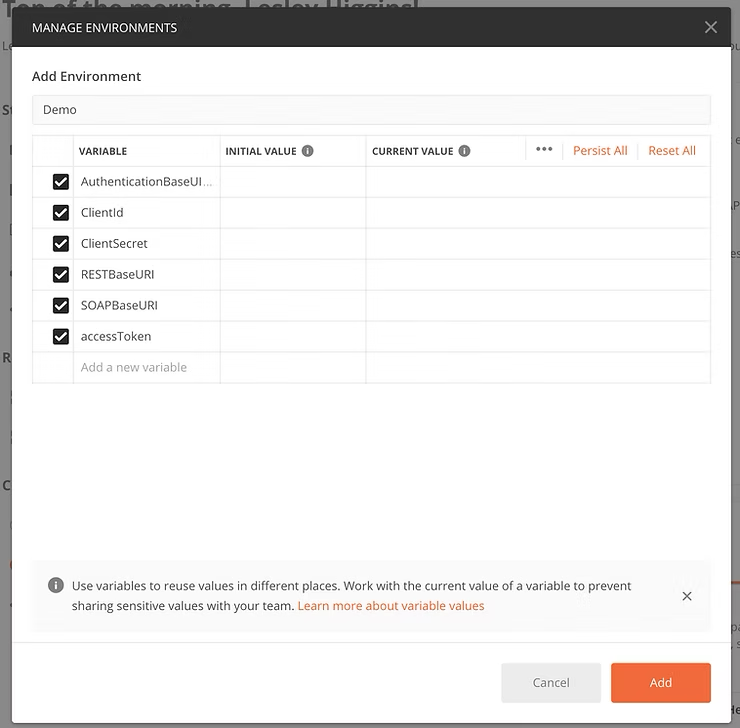
- Populate the initial value column with information from your Marketing Cloud API Component (except for
accessToken) - Click Add and select the Environment from the dropdown menu
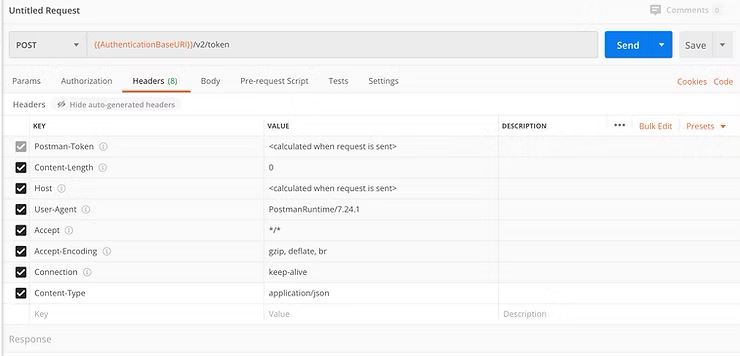
Step 4: Authentication Request
Get Access Token:
- Create a new request or open a new tab
- Set request method to POST
- Request URL:
/v2/token
Headers:
Content-Type: application/json
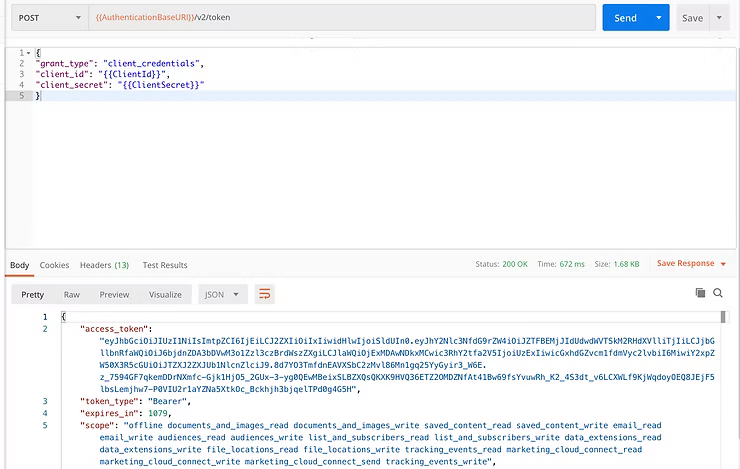
Request Body:
Select “raw” and paste:
{
  "grant_type": "client_credentials",
  "client_id": "",
  "client_secret": ""
}
Auto-Store Access Token:
Navigate to the Tests tab and paste:
var data = JSON.parse(responseBody);
postman.setEnvironmentVariable("accessToken", data.access_token);
This JavaScript will grab the access_token response and store it in the accessToken variable. The token lasts for 20 minutes.
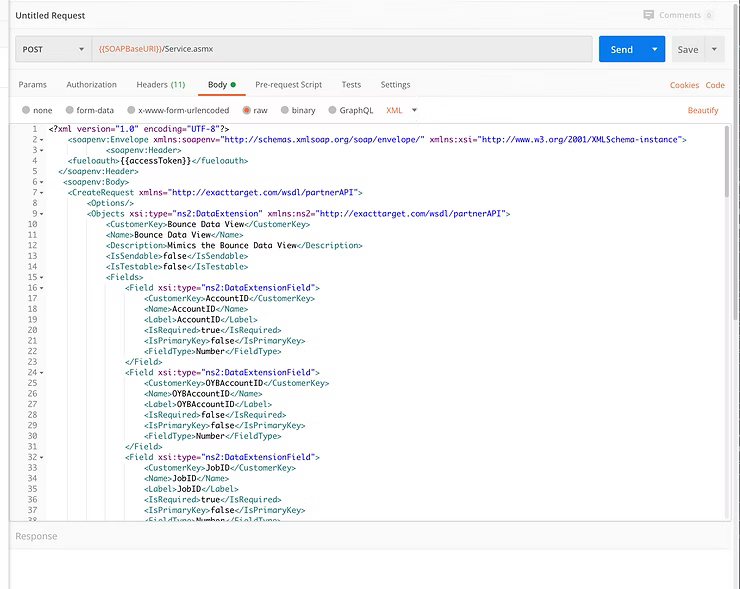
Step 5: Create Data Extension Request
SOAP Request Setup:
- Open a new tab in Postman
- Change request method to POST
- Request URL:
/Service.asmx
Headers:
Authorization: Bearer
SoapAction: Create
Content-Type: text/xml
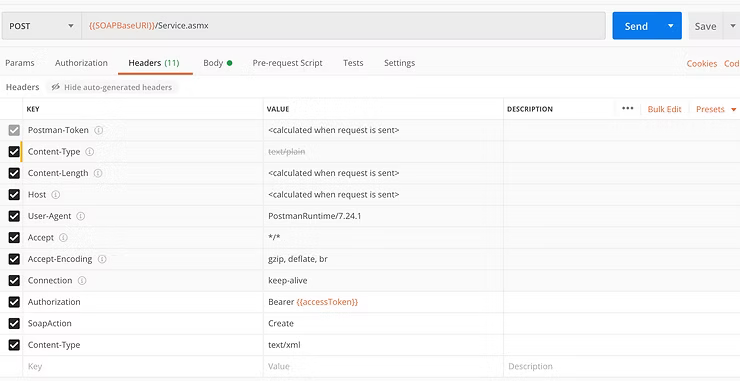
Request Body:
Under the Body tab, choose “raw” and drop in exactly what I have written in the GitHub files.
Example - Bounce Data View:
<soap:Envelope xmlns:soap="http://www.w3.org/2003/05/soap-envelope" xmlns:tns="http://exacttarget.com/wsdl/partnerAPI" xmlns:xsi="http://www.w3.org/2001/XMLSchema-instance">
   <soap:Header>
      <tns:fueloauth xmlns:tns="http://exacttarget.com/wsdl/partnerAPI"></tns:fueloauth>
   </soap:Header>
   <soap:Body>
      <tns:CreateRequest>
         <tns:Objects xsi:type="tns:DataExtension">
            <tns:Name>Bounce Data View</tns:Name>
            <tns:CustomerKey>Bounce_Data_View</tns:CustomerKey>
            <tns:Fields>
               <tns:Field>
                  <tns:Name>AccountID</tns:Name>
                  <tns:FieldType>Number</tns:FieldType>
                  <tns:IsPrimaryKey>false</tns:IsPrimaryKey>
                  <tns:IsRequired>false</tns:IsRequired>
               </tns:Field>
               <!-- Additional fields continue... -->
            </tns:Fields>
         </tns:Objects>
      </tns:CreateRequest>
   </soap:Body>
</soap:Envelope>
Hit Send and you will receive a response that says “Data Extension Created”.
Step 6: Customization Options
The files on GitHub will exactly replicate the Marketing Cloud Data Views. However, there are several things you might want to adjust before creating:
Common Customizations:
- Change the name of the Data Extension
- Add or delete fields to accommodate your needs
- Add ContactId as an additional field to append Salesforce ID
- Set data retention specifications (not included by default)
- Add primary keys if you want to run Updates instead of overwrites
Step 7: Populate with SQL Queries
Once you have these built, you want to populate them with SQL queries:
Basic Population:
SELECT *
FROM _bounce
Date-Limited Query:
SELECT *
FROM _bounce
WHERE EventDate BETWEEN GETDATE()-7 AND GETDATE()
Practical Applications
Once these Data Extensions are populated, you can create filtered data extensions to use as:
✅ Sending lists for targeted campaigns
✅ Suppression lists to exclude engaged users
✅ Audiences in Ad Studio for retargeting
✅ Journey entry sources for behavioral triggers
✅ Reporting data sources for custom dashboards
Available Data Views
The GitHub repository includes SOAP requests for:
- _Bounce - Bounce event data
- _Click - Click tracking data
- _Open - Email open data
- _Sent - Send event data
- _Subscribers - Subscriber information
- _Job - Email job details
- _Journey - Journey performance data
- _SurveyResponse - Survey response data
- And many more…
Troubleshooting Common Issues
Token Timeout:
If you get an authentication error, toggle back to the first tab and run the authentication request again to refresh the token.
Existing Data Extension:
If the Data Extension already exists, you’ll get an error. Change the name in the SOAP request.
Field Type Conflicts:
Some fields may need adjustment for your specific use case. Refer to the official Data Views documentation for field specifications.
Advanced Configuration
Adding Data Retention:
You can add retention specifications to the SOAP request:
<tns:DataRetentionPeriod>
   <tns:Period>Days</tns:Period>
   <tns:PeriodLength>30</tns:PeriodLength>
</tns:DataRetentionPeriod>
Adding Primary Keys:
For Update capability instead of Overwrite:
<tns:Field>
   <tns:Name>SubscriberKey</tns:Name>
   <tns:FieldType>Text</tns:FieldType>
   <tns:MaxLength>254</tns:MaxLength>
   <tns:IsPrimaryKey>true</tns:IsPrimaryKey>
   <tns:IsRequired>true</tns:IsRequired>
</tns:Field>
Benefits of This Approach
🚀 Automation: Create multiple Data Extensions quickly
🚀 Consistency: Identical structure across environments
🚀 Accessibility: Enable non-SQL users to work with Data Views
🚀 Efficiency: No more tedious manual Data Extension creation
🚀 Scalability: Easy to replicate across multiple Business Units
Conclusion
This approach transforms a tedious manual process into an automated, repeatable workflow. By leveraging the SOAP API and Postman, you can quickly create Data Extensions that replicate Marketing Cloud’s hidden Data Views, making this valuable data easily accessible to your entire team.
The combination of the GitHub repository and this Postman workflow means you can have a complete set of Data View replicas set up in any Marketing Cloud environment in minutes instead of hours.
Pro tip: Save your Postman collection and environment as templates so you can quickly set up new Marketing Cloud environments with the same Data Extension structure!